Showing posts with label beads. Show all posts

Friday, February 3, 2017

Beads Baubles & Jewels: Cord Bracelets

Paracord wrap bracelets from scrap 550, wire and beads.
Paracord Wrap Bracelets.
Image courtesy of Beads, Baubles & Jewels.
Rebroadcasting now on the Beads Baubles & Jewels website, Ashley Bunting shows us how to make elegant Parachute Cord Bracelets using wire, beads and scrap segments of 550 Parachute Cord. Episode 2304 - Cord Bracelets will be airing now through noon (EST) on February 10th.

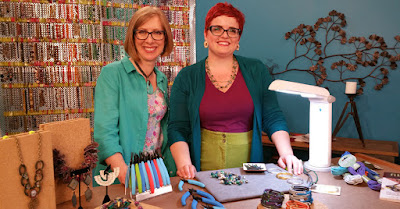
Katie Hacker and Ashley Bunting making Parachute Cord Bracelets.
Katie Hacker with Ashley Bunting.
Image courtesy of Beads, Baubles & Jewels.
 Downloadable project directions are available on the Beads Baubles & Jewels website here.

Beads and Paracord snippets. Image courtesy of Beads Baubles & Jewels.
Beads and Paracord snippets.
Image courtesy of Beads Baubles & Jewels.

Materials required to make these bracelets can be sourced from your local craft store, and Parachute Cord is available from Parachute Cord Craft.com. Requires:
  • 550 Parachute Cord (with core filler removed)
  • Memory wire
  • Assorted beads and/or charms of your choice
  • Scissors
  • Pliers (recommended)
  • Lighter or craft glue (with a little patience)
Easy-peasy! Did you give this a try? We want to see it - post your photos over on our Facebook page, or tag us (@macramestore) on Twitter.

Friday, May 6, 2016

Beads Baubles & Jewels:Cord Bracelets Re-Airing

Paracord Wrap Bracelets.
Image courtesy of Beads, Baubles & Jewels.

Rebroadcasting now on the Beads Baubles & Jewels website, Ashley Bunting shows us how to make elegant Parachute Cord Bracelets using wire, beads and scrap segments of 550 Parachute Cord. Episode 2304 - Cord Bracelets will be airing now through noon (EST) on May 13th.

Katie Hacker and Ashley Bunting making Parachute Cord Bracelets.
Katie Hacker with Ashley Bunting.
Image courtesy of Beads, Baubles & Jewels.
 Downloadable project directions are available on the Beads Baubles & Jewels website here.

Beads and Paracord snippets. Image courtesy of Beads Baubles & Jewels.
Beads and Paracord snippets.
Image courtesy of Beads Baubles & Jewels.

Materials required to make these bracelets can be sourced from your local craft store, and Parachute Cord is available from Parachute Cord Craft.com. Requires:

  • 550 Parachute Cord (with core filler removed)
  • Memory wire
  • Assorted beads and/or charms of your choice
  • Scissors
  • Pliers (recommended)
  • Lighter or craft glue (with a little patience)

Friday, February 5, 2016

Beads Baubles & Jewels:Cord Bracelets

Beads Baubles & Jewels episode - make these wrap bracelets
Paracord Wrap Bracelets.
Image courtesy of Beads Baubles & Jewels.
 
Rebroadcasting now on the Beads Baubles & Jewels website, Ashley Bunting shows you how to make elegant Parachute Cord Bracelets. Episode 2304 - Cord Bracelets will be airing now through noon (EST) on February 12th.

Katie Hacker and Ashley Bunting crafting c/o Beads Baubles & Jewels
Katie and Ashley. Image courtesy of Beads Baubles & Jewels.
 Downloadable project directions are available on the Beads Baubles & Jewels website here.

Beads and Paracord from Beads Baubles & Jewels
Beads and Paracord snippets. Image courtesy of Beads Baubles & Jewels.
Materials required to make these bracelets can be sourced from your local craft store, and Parachute Cord is available from Parachute Cord Craft.com. Requires:
  • 550 Parachute Cord (with core filler removed)
  • Memory wire
  • Assorted beads and/or charms of your choice
  • Scissors
  • Pliers (recommended)
  • Lighter or craft glue (with a little patience)

Thursday, October 2, 2014

Feeling Secure with Your Knots

Zeppelin Bend made with 325 Parachute Cord - Recommended Finish
Zeppelin Bend made with Parachute Cord 325.

Stretch Magic™ is slick and this can create problems when tying the ends together as knots require friction to stay tied. There are some complicated knots (not difficult to tie with practice) that work exceptionally well. My favorite is the Zeppelin Bend*. This knot holds well with Stretch Magic™ and has the added benefit of keeping the ends in a straight line. I recommend using our Parachute Cord 550 for learning knots.

For the rest of us who lack patience (or just don’t want to learn knot tying,) there is a quick, easy and permanent solution—use glue. We highly recommend using G-S Hypo Cement.

Post by Joel Hooks.

* Link takes you to the International Guild of Knot Tyers website. It includes a PDF download for a printable version.

Wednesday, July 9, 2014

Shiny New Skulls & Metal Gear

Anchor Buckle Bracelet | Pepperell Braiding Company
Bracelet made with an anchor buckle.

We have a few new items in stock at Parachute Cord Craft.com:

Anchor Buckles | Pepperell Braiding Company
Anchor buckle closures.
First off are the anchor buckles (set of 3). Nautical and sophisticated for bracelet making. Perfect for Parachute Cord thicknesses 95 to 550.

Skull Beads | Pepperell Braiding Company
Vertical-hole skull beads.
Due to popular demand, we're now offering skull beads with a vertical hole.

Skull Beads with Glow Eyes | Pepperell Braiding Company
Vertical-hole skull beads with glow eyes.
Also available with glow-in-the-dark eyes (2 beads/package).

Wednesday, May 21, 2014

Layers of Inspiration

Layered Coil necklace DIY craft | Pepperell Braiding Company

It's almost Summertime. The season of bubbles, peppers, and evenings out. We can accessorize that! Above is one of the EASIEST necklaces you'll ever make: Meet the Layered Bubble Necklace:

Use 1 yard strands of 2mm Amy Craft Cord. The colors used in the Pepper-Flavored sample pictured above are: Pink (05), Red (06), Coral (07), Cranberry (08), Orange (10), and Sunshine (12). The strands can be cut a little longer if you'd like to make this piece to just slip over your head. You will also need ribbon crimps and some sort of a closure to finish this necklace.

Directions: The only knot you need to know is the Coil:

Coil Knot Directions by Pepperell Braiding Company
Coil Knot diagrams.

Very easy, but practice on some scrap cord first to make the perfect bubbles. Start from one end of the cord and work your way down making coil beads every 2"-4". They don't have to be even; and they don't have to be perfect.


Once all the cords are full of bubbles, finish off the necklace with ribbon crimps. I recommend crimping one end first, then hold the necklace to yourself to test the length and make sure the layers fall where you want them to.

Layered Coil Necklaces in Cherry and Blueberry Flavors | Pepperell Braiding Company
Finished Layered necklaces in Cherry & Blueberry flavors!

Staggering the layers may help a bit. If you find making the coil a bit complicated, try tying the "bubble beads" using a simple Overhand Knot instead. The bubbles may not be as big, but you could always add beads to plump up the necklace with a little extra glitz!

~Samantha

Friday, May 16, 2014

Knotty Inspiration

Braided Knotty Cuff DIY from Pepperell Braiding Company
Coral macrame knotty cuff bracelet.

Above is a Summer-y sample of a "knotty" macrame craft: beach-y, warm, and pretty!

This project uses 2mm Amy Craft Cord. The colors we picked are Red (06), Pink (05), Coral (07), and Cranberry (08), but don't be afraid to test the waters with other color combos. To make the cuff start with 4 strands of Amy cord, about 2.5-3 yards of each color. This sounds like a LOT of cord; but it will be consumed by all the knots and weaves.

Directions: Fold each strand in half and make 4 lengths of Alternating Half Knots. Using ribbon crimps, secure the 4 ends and then (flat) braid the strands together. Finish with another ribbon crimp, then decorate with additional findings and chains of beads.

Braid close-up from the Coral Knot Cuff | Pepperell Braiding Company


The findings are all available through your local craft store. If you have additional questions, feel free to ask.

~Samantha

Tuesday, April 29, 2014

Unfinished Wood Bead Sale

Unfinished Wood Bead Sale Extended to May 31st

Wheeew-Whooo! Sale Extended a full month! Now through May 31st, enjoy the Unfinished Wood beads at a discounted rate. Only on Macrame Super Store.com.

Monday, April 28, 2014

Partially Dipped: Wood Bead Finishing Part 5

Bead Dipping  Tutorial - Pepperell Braiding Company

Here we return to our bead finishing tutorial Dip and Drip from day one. This isn't a full-coating technique, but it's decorative so it makes for an unique finish. This time I quite literally dipped the bead in the paint and set it aside for drying. For the dipping to work, one may want to master the art of dipping an ice cream cone into chocolate sprinkles. Master may be a strong word, but it's appropriate here. There are a few things to consider on the dipping:


You will want to use a thinned-down paint. Just as the hand-painting technique, artists' acrylics are a bit too thick to manage. Even when diluted with water, the paint thins out a bit too much. Leave the paint as it is and you get chunky-glop look above.


And here we have a nicely dipped bead... much like a strawberry ice cream cone. Maybe still a little thick, but that can be adjusted with a splash of water. Again I used the matte craft paints because they have just the right consistency.

Now speaking of ice cream, how about some sprinkles?


Or glitter? Or confetti? Here the bead doesn't need so much of a dipping-action. I lightly coated the end of the beads with craft glue and sprinkled the glitter on top. When the glue dries (about a half hour), just tap the beads to release the excess glitz and repackage the "run-off" glitter.

Since the bead dipping doesn't completely coat the beads, you may want to sequester these beads for interior use only. You could spritz with a clear sealer; but you're still running a risk of the thick paint or glitter from chipping off. 

Have fun with your bead decorating! If you have additional techniques, write us - we want to hear from you :-)

~Samantha

Thursday, April 24, 2014

All in the Details: Wood Bead Finishing Part 4

Bead decorating from Pepperell Braiding Company

Tell me these aren't fun! Decorating your beads is only limited by your imagination. It can be done as simply as making a few dots or squiggly lines, but even this tiny detail draws a lot of attention. Note: All the beads above were painted and sealed before they were decorated.

Bead decorating utensils - Pepperell Braiding Company
Decorating utensils.

Now put the paint away. We're going to focus on PENS. I occasionally used a small brush to make some of the metallic details you see above (just because I didn't have a metallic pen, but the paint was handy). Pens are a bit easier to control and the ink usually dries so quickly there's limited worry for smudging, blotching, or stain transfer. So if you're in a production frame of mind, you can move as quickly as your genius and hands can scribble.

The one pen which surprised me most is the jelly-roll: it works on sealed wooden beads! Turning the pen every now and then to keep it rolling may help, but they work. So for fine detail jelly and felt pens with tips .5mm or smaller are ideal.

"Painting" the bead with markers - Pepperell Braiding Company

Highlighters can be used... on completely unfinished beads. I attempted to "paint" the beads with the highlighters as well as other markers. Just note that the ink is transparent so coating over and over will intensify and darken in some areas. The end results are something else though - like water colored beads.

Beads coated with pen and ink. Pepperell Braiding Company.
The green bead on the lower right was made with
vertical overlapping strokes of the pen tip.

Decorating the beads using pen and ink is relatively simple. It can be time consuming since all of your focus is on ONE bead at a time. I recommend this when working large beads in smaller batches. Small beads (say less than 1") may not catch the eye so easily so you could just be wasting your time on fine detail. 

Again it may go without saying: spray the finished beads with a clear sealer so that you don't see your hard work bleed or fade if it finds itself meddling with moisture.

If you are painting your own wood beads, we want to see them. Feel free to leave a link to your work in our comments.

~Samantha

Thursday, April 17, 2014

Stroke of the Brush: Wood Bead Finishing Part 3

Hand painted bead tutorial - Pepperell Braiding Company

Mmm-mmm! Hand painted beads. You can't get a cleaner look than that... except for maybe spray painting. While this method does take time, the finished look is second to none. 

Hand painting wooden beads - Pepperell Braiding Company
Painting wood beads by hand.
Time it does take... bead after bead for hand application. Unfortunately this method does not guarantee a finished look on the first coat, unless you've:

A. Primed the bead ahead of time, and even this wasn't 100% helpful.
B. Use a paint-primer combo paint type (see your local hardware store exterior/interior paint counter).
C. You're not too eager to have a completely coated bead.

As you can see above, you can mount your bead onto a pencil or disposable chopstick (or even a finger,) and then go to town slapping paint everywhere. However, most beads are a little flat at the entrance of the hole, so pinching the ends between two fingers to stabilize may be all that's necessary.


Completed hand painted wooden bead - Pepperell Braiding Company
Tah-dah! Finished wooden bead.

For this method I used both artists' acrylics and plain, cheap, simple (matte) craft paints. Honestly, I really have a preference to the cheap stuff. The paint applies surprisingly even and the color saturation can easily be pumped up with a couple coats of clear sealer. The artists' acrylics will give you a nice stained effect and an instant sheen; for a nice flat color, opt for the craft paints.


Artists' Acrylic painted beads leave a shiny & stain-like finishCraft acrylic painted beads will require a gloss coat finish.

Con list of the brush:
  • Multiple layers required (maybe 2 or 3 coats ideally).
  • Slow... see previous note & add a few minutes for drying time.
  • A little tedious if you have a lot of beads to manage.

Pro list for brush technique: 
  • Your color pallet is only limited by your imagination!
  • Clean looking results... unless you just glop on the paint.
  • The mess factor is significantly lower then other bead coating methods unless you're clumsy and drop things often. Then you may want to worry more about bead impressions on your clothing and furniture.

For small projects requiring maybe under two dozen beads, this really is the finishing method for you. Or also if you're meticulous about your details, you would probably enjoy this very much.

Professional painters tips: Really try to prime your beads first, especially if there's an obvious wood grain, because that can bleed through over time. Also I used a clear spray paint to seal my beads, but you can most certainly use a paint-on cover. The spray is just much faster.

Monday, April 14, 2014

Spray & Pray: Wood Bead Finishing Part 2

Spray painting beads - Pepperell Braiding Company 2014
Spray those beads!
Note to self: not meant for windy days.

Spray painting is my first suggested route to coating your beads. With practice the coat is even and you can cover a lot of beads in one spread.

Spray painting beads - Pepperell Braiding Company 2014
And spray again... and then apply clear coat.
I say "one spread" but I really mean on one pass. As recommended you will want to pass the spray paint across the batch again once or twice later in the day. Very little is required by means of materials other than your beads, the cans of spray paint, and spatter surface. The toughest material to acquire (especially in New England!) is the weather ;-)

Con list for Spray & Pray:
  • Color selection is limited by what's on the store shelf.
  • A little hazardous - so either wait for suitable weather or you'll have to invest in ventilation and/or a spray booth. 
  • Mess factor of 7 of 10: the nozzle should ALWAYS point away from you. ;-) Also, put down either a drop-cloth or newspaper... something you're willing to permanently mark with paint.
  • To allow for dry time and multiple coats, this can be an afternoon project.

Pro for Spray & Pray:
  • Paint coating itself is very fast. Even if you include the con of the drying time, you can get professional results with mere minutes of hands-on time.
  • Clean even application.
  • Pretty glossy sheen with minimal effort.
My paint tip: After the first spray layer dries (allow about an hour), turn all your beads to apply layer number two. This will ensure an even coat and catch any spots which may have been missed on the first pass.

I highly recommend the Spray and Pray method over others for large finishing projects. Again, try to blast the beads with a can of clear-coat to make them super-glossy and seal them from weather elements.

~Samantha

Friday, April 11, 2014

Dip & Drip: Wood Bead Finishing Part 1

Dipped wooden Beads - Pepperell Braiding Company
Dipped painted wooden beads.

This is one of the messiest methods of bead painting. Hands down. It's not the prettiest of finishes either.

In theory, you can dip your beads in paint and it will evenly coat the surface. Nope. As you can see by the above picture, the coating can be gloppy and uneven. Boo!

To paint via Dip & Drip, you will need:

  • Beads (of course!)
  • Plastic sheet or waxed paper to rest your wet beads.
  • Plastic zipper sandwich bags.
  • Acrylic craft paint.
  • Disposable chopsticks for drawing out the wet beads (recommended one pair/color mix).


Here's what I did:

Dipped bead painting - Beads in plastic bag. Pepperell Braiding Co

Squirted a bit of acrylic paint into the sandwich baggie. Tossed in the beads and...

Dipped bead painting - Beads mixed in paint. Pepperell Braiding Co

smooshed the paint around. I kept checking on the beads to be sure the paint was coating the whole bead. When the beads are completely coated, fish them out using a chopstick and set them onto your drying surface (ie. waxed paper).

The results were not 100% bleak: if you plan to try this out yourself (because the results are boarder-line cool), I recommend using just plain simple craft paints. They're a little more watered down because the thicker artists' acrylics are a bit too clingy and thick. Though the acrylics can be diluted with water, this will leave the beads with more of a stained effect... an uneven stained effect, but a stain look nonetheless. So basic craft paints - gloss or matte (if you opt for matte, remember to seal the beads after to prevent bleed especially if your beads will be used outside).

Pros to this method:
  • You can finish a bunch of beads at once.
  • It's just plain fun! :-)
  • It's inexpensive.
  • It's fast.
Cons to Dip and Drip:
  • MESS-mess-MESS.
  • Uneven finished effect.
  • Paint can get trapped in the hole.
I will be re-visiting the Dip & Drip method another time. Coming soon: Spray Painted beads! Suggestions welcome, so feel free to leave them in the comments.

~Samantha