Showing posts with label Stretch Magic. Show all posts

Wednesday, March 23, 2016

3 Ways to Tie off Stretch Magic

FREE Download: How to tie/finish your Stretch Magic jewelry creation.
Need just a little more help tying you Stretch Magic® project? We've got a fully illustrated downloadable instruction sheet for you! It includes three easy methods for tying-off Stretch Magic® jewelry. To add a little bit more confidence to the knots, feel free to dab a little G-S Hypo Cement on the last knot.

Tuesday, December 22, 2015

NEW: Silkies Ropes

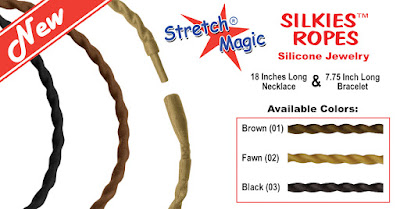
Stretch Magic Silkies Ropes Jewelry available NOW!

They are here! We are now offering the Stretch Magic® Silkies Ropes™ in bulk and retail packed. They are currently available through the Macrame Super Store website, or by contacting us directly: 1-800-343-8114 ext. 25.

Friday, November 20, 2015

Silkies Ropes... Coming SOON!

Stretch Magic Silkies Ropes Necklaces & Bracelets

They're ALMOST HERE!

Almost! We promise ;-)

The long anticipated Silkies Ropes jewelry are right around the corner. We're now accepting tentative orders which will be shipping early December. Call us for wholesale inquiries and ordering: 1-800-343-8114 ext. 25. More information about Stretch Magic® Silkies™ Ropes at Pepperell.com. Product will be available to purchase online at MacrameSuperStore.com and RexlaceClub.com.

Monday, September 21, 2015

DIY Wind Chimes

Make a beautiful natural bamboo wind chime with Stretch Magic.
Turn a quiet breeze into a soothing melody....

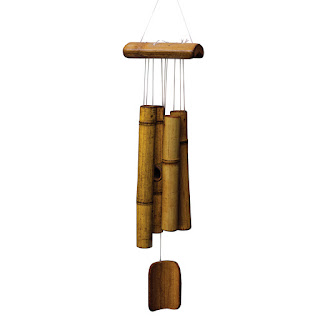
Stretch Magic ® isn't just for jewelry-making. We now have two new kits to add to the Stretch Magic® community: all natural bamboo wind chimes. Each chime makes it's own unique sound. Both stunning an simple to assemble. We have them available at the Macrame Super Store website - available here. Take a closer look at our new additions:

DIY Bamboo Wind Chime - 4-Bar Soothing Sound
4-Bar Wind Chime


DIY Bamboo Wind Chime - 3-Bar Soothing Sound
3-Bar Wind Chime

Tuesday, October 28, 2014

Bond With Your Jewelry

G-S Hypo Cement for Stretch Magic Jewelry Finishing
G-S Hypo Cement is available now.
It's finally here! The EASIEST and cleanest glue to use for finishing your Stretch Magic jewelry projects: G-S Hypo Cement.

It's available on our web sites: Macrame Super Store and Rexlace Club.

Tuesday, October 7, 2014

DIY Tattoo Jewelry

Stretch Magic Tattoo Choker - Pepperell Braiding Company
Stretch Magic Tattoo Choker Pattern.
We've noticed a growth in popularity of the Tattoo jewelry and we've got instructions for you! FREE instructions! The directions are available to download from Macramé Super Store.com and at Rexlace Club.com. All you really need is a little Stretch Magic jewelry cord and you're ready to start knotting!

Tattoo Choker Directions from Pepperell Braiding Company
Tattoo Choker Project Sheet.

Want a bonus? Follow the directions as they're shown using 4 feet of Stretch Magic jewelry cord to make a matching bracelet!

Stretch Magic Jewelry Cord is available here and here or at a craft retailer near you!

Thursday, October 2, 2014

Feeling Secure with Your Knots

Zeppelin Bend made with 325 Parachute Cord - Recommended Finish
Zeppelin Bend made with Parachute Cord 325.

Stretch Magic™ is slick and this can create problems when tying the ends together as knots require friction to stay tied. There are some complicated knots (not difficult to tie with practice) that work exceptionally well. My favorite is the Zeppelin Bend*. This knot holds well with Stretch Magic™ and has the added benefit of keeping the ends in a straight line. I recommend using our Parachute Cord 550 for learning knots.

For the rest of us who lack patience (or just don’t want to learn knot tying,) there is a quick, easy and permanent solution—use glue. We highly recommend using G-S Hypo Cement.

Post by Joel Hooks.

* Link takes you to the International Guild of Knot Tyers website. It includes a PDF download for a printable version.

Tuesday, September 30, 2014

Glue it!

G-S Hypo Cement (glue) - Pepperell Braiding Company
G-S Hypo Cement.

We (as well as our customers) have had excellent results with G-S Hypo Cement to finish off projects made with Stretch Magic™ jewelry cord.  It holds strong while staying flexible. What really makes this product unique is the applicator. The “hypo” in the name refers to a hypodermic needle like tube that makes it possible to apply the right amount of glue inside the smallest bead. The cap is fitted with a metal rod so that when the glue is closed it will not dry up or clog the needle applicator.

It only takes a small drop of cement to secure the knot on your beading project, little effort with a great return is why we us G-S Hypo Cement. Just remember to read all the instruction and warnings specified by the manufacturer.

Post by Joel Hooks.

Monday, June 30, 2014

Let Freedom be FREE

Stretch Magic Jewelry Cord | Pepperell Braiding Company
Stretch Magic from Pepperell Braiding Company
All Stretch Magic Jewelry cord online orders will be shipping for FREE!*

It is available for FREE shipping from Macrame Super Store or Rexlace Club websites.

* Visit the sites' FAQ sections for "Free-ness" details.

Monday, June 16, 2014

Fox-ing Around!

DIY Tutorial: Fox Mask from Brain Noodles - Pepperell Braiding Company

Foxes are CUTE-CUTE-CUTE! What child wouldn't want to pretend to be one?

Make this quick easy fox mask for pretend play, Birthday parties, Halloween costumes, or just for hanging on the wall.

Materials:
Two 18 inch Orange/Yellow Striped Brain Noodles
One 12 inch White Brain Noodle
One 1-1.5 inch Black Pompom
Eighteen inches of White Rexlace (Cut into Six 3 inch pieces)
Hot Glue
Stretch Magic (about 18 inches of 1mm Clear)

Directions:
Fox Mask Tutorial: Step 1 For Figure-8 | Pepperell Braiding Company

Step 1. Shape the 18 inch Brain Noodle into a figure-8. Fold the ends to secure. You can use a dab of glue where the ends overlap if it keeps un-hooking.

Fox Mask Tutorial: Step 2 Add Ears | Pepperell Braiding Company

Step 2. Cut the second Brain Noodle in half and shape the pieces into ears. Bend or fold the ends of the ears to either side of the eyes.

Fox Mask Tutorial: Step 3 Add nose and mouth | Pepperell Braiding Company

Step 3. Glue the pompom (the fox's nose) to the center of the mask. Glue the white Brain Noodle to the bottom part of the mask following the shape of the contour of the mask shape.

Fox Mask Tutorial: Step 4 Add whiskers and mask strap | Pepperell Braiding Company

Step 4. Glue the Rexlace whiskers into the mask. Tie a piece of Stretch Magic to the edges of the mask so you can wear it!

Mouse Mask made from Brain Noodles | Pepperell Braiding Company

You don't have to stop at foxes - look at this cute mouse! Just change the ear shape a bit you can make any animal you want to be.

-- Tiffany Dias